

For many, manicures and pedicures are a way for people to relax while pampering themselves. However, the price of frequent manicures and touch-ups can prevent people from taking proper care of their nails.
For others, they don’t feel comfortable showing their feet in public or just prefer to take things in their own hands, so to speak. If that’s you, your nails will thank you for this DIY guide to manicures and pedicures.
Essential Manicure Tools
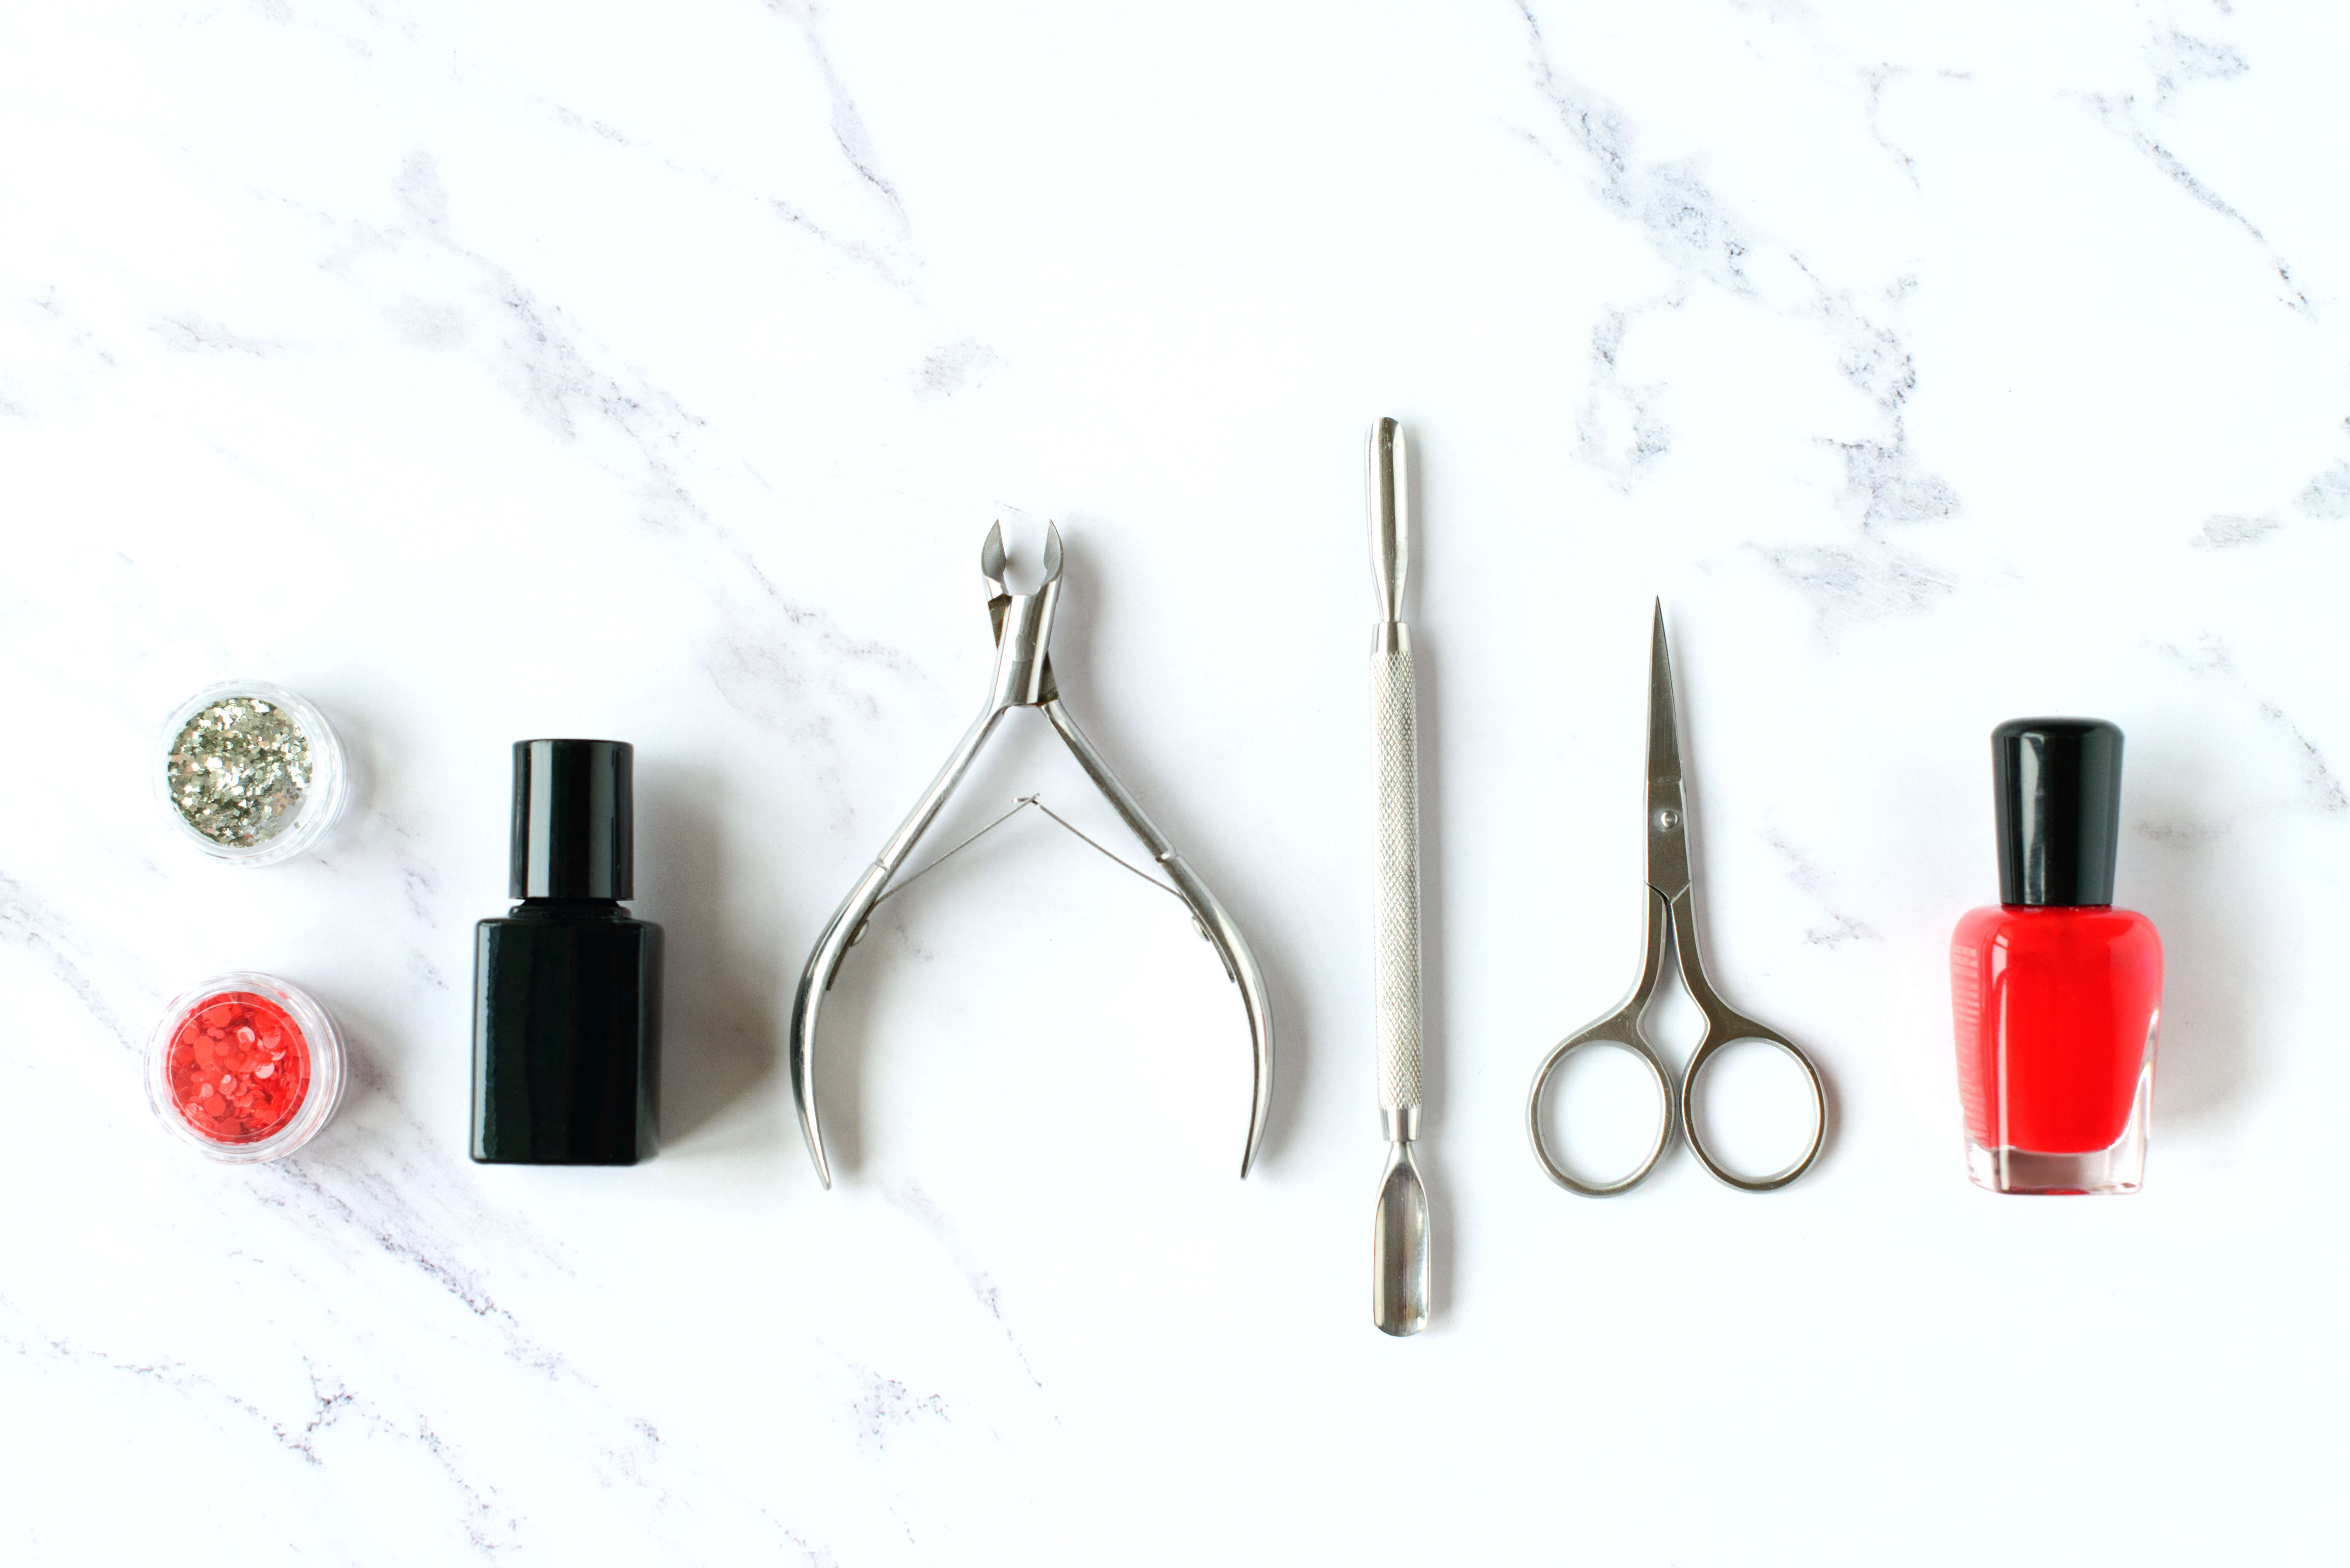
Before you begin the manicure, you need to have all of the essential tools gathered in reaching distance. Necessary tools for a manicure include:
- Finger and toenail clippers to trim nails
- Emery board nail file and buffer to shape and buff nails.
- Non-Acetone nail polish remover and cotton pads to remove old polish and fix any mistakes.
- Cuticle pusher and callus remover (for feet) to push back (but not remove) cuticles.
- Hand lotion to moisturize the skin around the nails.
- Base coat to apply to the nails to protect the nail bed.
- Nail polish of your personal color choice.
- Top coat to protect your manicure.
How to give yourself a manicure at home
Remove Old Polish

Before you begin a fresh manicure, you need to remove all traces of the old manicure. Nail experts recommend using a non-acetone nail polish removers to prevent the skin from drying out. Use cotton balls or pads to apply the remover to your nails. Wash your hands in soapy water to soften the nails for the clipping step.
Trim Nails

Once your nails are free from the old polish, you’re able to see them clearly. This will help you determine how much to clip. Use nail clippers to cut each of your nails in an even length.
We will discuss your cuticles in another step, but it is best not to clip or remove them. The cuticles protect against bacteria from getting into your nail beds and infecting your skin.
Shape Nails
After your nails have been clipped, it is time to shape them with a nail file or emery board. The most popular nail shapes are rounded edges, but you can use whatever shape you like. Emery boards are better to use. They keep the nails intact. Metal files can cause nails to splinter. File in one direction instead of a back and forth motion.
Finish this step by buffing the top and sides of your nails to make them smooth and even. Don’t over-buff, though, or the nail polish won’t stay on.
Soak Nails in Warm Water
Soaking your nails in a bowl of warm water and soap softens the hard cuticles for the next step. You can use shampoo or face cleanser instead of soap. Don’t soak your hands for more than five minutes or you’ll risk damaging your nails.
You can use the warm water to exfoliate your hands at this point. Removing the dead skin cells will make your hands and nails look better after your manicure.
Push Back Cuticles (Do Not Remove)

Your manicure tools should include a cuticle pusher. Gently push the cuticle overgrowth back into the nail bed. Many salon manicures include cutting the cuticle, but that is a delicate process that should be left to the professionals.
At this step, you can also remove any hangnails that are hanging out at the edge of your nails.
Moisturize Hands with Lotion
The nail polish remover and warm water can cause the nails and cuticles to try out. Apply a lotion to replenish the lost moisture. Be sure to work some of it into your cuticles, too.
Remove Excess Moisturizer
Once the hand lotion has been absorbed, you have to remove the excess oil and moisture from the skin. Use a drop of the non-acetone nail polish remover onto a cotton pad and run it over each nail to remove the oil. Too much moisture will ruin the nail polish you’ll apply in just a few more steps.
You can use rubbing alcohol to remove the oil if you don’t want to use nail polish remover. The rubbing alcohol might help prevent your nails from chipping after the manicure is complete.
Apply Base Coat

The base coat is an important step that shouldn’t be skipped. The base coat hydrates the nail and prevents cracking or staining. Apply a thin layer of the base coat to each nail and let it air-dry.
Apply Chosen Nail Polish Color

Salon professionals apply the nail polish using three swipes instead of one big swipe. The swipes start with one in the middle of the nail and then one swipe on each side. Apply the polish in thin layers with light strokes. If the polish is too think, it’s more likely to chip and crack.
Two coats of the nail polish color is recommended if you use thin layers. Allow the polish to air-dry between applications or use cold air to dry. Hot air can cause chips and polish bubbles.
Fix Mistakes
Before applying the top coat is the best time to fix any smudges or mistakes. You can use the tip of a finger on the other hand to dip in nail polish remover and dab the smudge. This will cover the smudge with the surrounding nail polish. Apply a thin swipe of nail color to fully cover the mistake.
Apply Top Coat
Once the color nail polish is completely dry, it’s time to apply the top coat. Drugstores sell a quick-dry top coat that won’t take as long to dry as the other polishes. Use the top coat several times a week to keep your manicure chip-free and immaculate for longer.
Moisturize Hands Again
When all of the nail polish is dry and the mistakes are corrected, apply the skin lotion to your hands and cuticles again. Massage it in deeply to help combat all the microtrauma that your skin and nail bed has undergone. Manicures look great, but they can take a toll on the skin surrounding the nails if you don’t replenish the lost moisture.
Take care with using your hands for a few hours after your manicure. Using your nails to do things such as open soda cans is bad for your nails regardless of whether you have a fresh manicure or not.
DIY Manicure Tips
Manicures are more complex than just painting your nails. There are tips that you should keep in mind when you give yourself a manicure.
Touch Up Manicure
Your manicure can be touched up in just a few minutes every other day. Adding a new layer of the top coat prevents your manicure from cracking and lets it last longer.
Don’t Shake It Up
Shaking the nail polish bottle often creates little bubbles that can ruin the look of your manicure. Instead of shaking, gently roll the bottle in the palm of your hand. Most nail polish bottles have something, such as a ball, inside the bottle to stir the polish around.
Sterilize Manicure Tools
Your manicure tools should be sterilized in rubbing alcohol after each use. This prevents bacteria from forming on the tools. After the tools have dried, store them in a plastic bag to prevent rusting.
Use Three Strokes Method
One, two, three strokes, you’re out! Instead of applying the polish in one, thick stroke, apply using the three stroke method. Quick, thin strokes starting with one stroke down the middle of the nail and ending with one stroke on each side of the nail. It helps ensure the entire nail is covered with the polish.
DIY Pedicure

The pedicure steps are almost the same as the manicure steps, but with some changes:
Remove Old Polish
Many people neglect to remove the old polish from their toenails before applying a new coat. Removing the old polish with non-acetone remover allows you to check the health of your toes. Clean, polish-free toes also help the new coat of polish stay on longer.
Soak Feet In Warm Water
Before you soak your feet in warm water, you can use a callus file to remove calluses and other skin blemishes. You can also do that after your feet have soaked in warm, soapy water for about 10 minutes or use a wet pumice stone on your dry feet.
Soaking your feet helps soften the cuticles and toenails.
Cut Toenails

Once your feet have soaked for 10 minutes, dry them with a towel. Cut your nails in a straight, even manner.
Unlike your fingernails, your toenails don’t need to be shaped in rounded edges. Straight across is better to keep them from snagging on clothing.
Push Back Cuticles
The warm water softens the hard cuticles, making them easier to push back. As with the manicure, completely removing the cuticles is a bad idea. The cuticles help keep your nail bed safe from infections.
Moisturize Feet and Nails

Applying skin lotion at this point helps replenish the moisture your skin has lost from the warm water and nail polish remover. Don’t apply too much moisturizer, though. You’re going to be removing it in the next step.
Remove Excess Oil
Too much oil on the nails prevents the nail polish from adhering properly and ruins your pedicure. Use a dab of nail polish remover or rubbing alcohol on a cotton pad to swipe over each nail. This removes the excess oils from the nail.
Apply Base Coat
The base coat keeps the nail hydrated. If you’re using darker polish color, such as red, the base coat prevents staining.
Apply Nail Polish Color
Apply the nail polish color using the three strokes method for easy, full coverage. The three strokes start with one stroke in the middle, followed by two strokes on either side of the nail. You can use one or two coats of nail polish for your pedicure.
Fix Smudges
Smudges can be fixed easily with a drop of nail polish remover on a q-tip.
Apply Top Coat
The top coat prevents cracks and prolongs the life of your pedicure. You can apply the top coat every other day once the manicure is complete.
Moisturize Again
The last step in the pedicure and manicure is to apply skin lotion. The lotion prevents the skin from drying out, which is really important on the feet.
You might still prefer to have salon manicures and pedicures because they are very relaxing. But now you have the guide on how to do both at home in a pinch.
References
 Cute Summer Nail Art On Toes
  All About Dip Powder Manicure